Showing posts with label How to.... Show all posts

Sunday, November 15, 2020

How to record your screen in PowerPoint?

Few days back, a tweet from Jen Gentleman, community manager at Microsoft, asking "Do you know you can record your screen using PowerPoint?" evoked lots of responses. And all were eager to know how to do this? So I thought as so many PowerPoint users are interested, why not post about this feature.

How to record your computer screen in PowerPoint?

You can record your computer screen and related audio, and then embed it in your PowerPoint slide or you can save it as a separate file. Let us check the steps: 

  • Open the PPT slide that you want to put the screen recording.
  • On the Insert tab of the ribbon, select Screen Recording.
  • On the Control Dock, click Select Area (Windows logo key+Shift+A), or, if you want to select the entire screen for recording, press Windows logo key+Shift+F.

    The Windows logo key+Shift+F keyboard shortcut is only available if you have an Office 2016   Click-to-Run installation; MSI-based installations don't have the shortcut.
If you have opted to select an area, you see the cross-haired cursor Cross haired cursor . Click and drag to select the area of the screen you want to record. (If you have already done a screen recording during your current PowerPoint session, your prior area selection will appear on the screen. You can proceed with recording if that selection area suits you, or you can click Select Area to start over.) 

PowerPoint automatically records the audio and the mouse pointer, so by default those options are selected on the control dock. To turn them off, deselect Audio (Windows logo key+Shift+U) and Record Pointer (Windows logo key+Shift+O).

  •  Click Record (Windows logo key+Shift+R).Unless you pin the Control Dock to the screen, it will slide up into the margin while you record. To make the unpinned Control Dock reappear, point the mouse cursor at the top of the screen.
  • To control your recording:
    •  Click Pause to temporarily stop the recording (Windows logo key+Shift+R).
    •  Click Record to resume recording (Windows logo key+Shift+R).
    •  Click Stop to end your recording (Windows logo key+Shift+Q) (shown below).

  • When you are finished recording, save your presentation: File > Save. The recording is now embedded on the slide you selected. To save the recording itself as a separate file on your computer, right-click the picture on the slide that represents the recording, and select Save Media as. In the Save Media As dialog box, specify a file name and folder location, then click Save.

To set your video 'Start' settings, right-click the video frame, click Start, and pick how you want your video to start in your presentation; automatically when a slide appears, or when you click the mouse.

To Trim your video,Right-click the video frame, and click Trim.To determine where you want to trim your video footage, in the Trim Video box, click Play.When you reach the point where you want to make the cut, click Pause. Use the Next Frame and Previous Frame buttons to specify precise timing. To trim the beginning of the clip, click the start point, when you see the two-headed arrow, drag the arrow to the desired starting position for the video. Similarly, to trim the end of the clip, click the end point, when you see the two-headed arrow, drag the arrow to the desired ending position for the video. Click OK.

To apply a style to the video frame, right-click the video frame, click Style, and pick a style you like.

 If you are running older version of Office, like Office 2013, please check the source for the steps.

Monday, August 29, 2016

How to use Windows Maps to measure distance

Many a times you want to find distance between locations on the Maps as per route of your liking. Suppose you wanted to plan a run, a marathon or want take a bike ride or something like that. You can plan this using Windows Maps before you actually head out.

Measure Distance tool:

Windows Maps now provides ‘Measure Distance’ tool. Using it one can measure distance.

  • Open Maps app
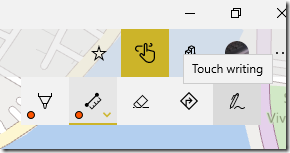
  • Click on the Windows Ink Toolbar on top right corner of the Map

MapsDistance01

  • Click on the ‘Measure Distance’ option.

MapsDistance02

  • If you are not using the Pen and want to use your Mouse then click on the ‘Touch Writing’ option

MapsDistance03

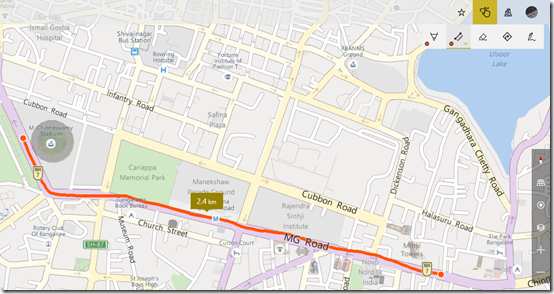
  • Once done, just draw the line following the path you want starting from the point from where you want to measure and ending at the destination point.

MapsDistance04

  • And the measuring tool will show the distance between these two points.

One can also search for a location you want to route and trace the path using the Measure distance tool. One can use Eraser to erase or make changes to path drawn. One can also change the units of distance from Settings.

MapsDistance05

This feature is very useful and can be used in various events.

( Using Windows 10 Build 14905, Windows Maps 5.1608.2311.0 )

Saturday, November 21, 2015

[tip]: Remove app suggestion ads from Start menu

Here’s a small Windows 10 tip. In Windows 10 a new ‘feature’ or a suggestion where Windows suggests you an app in the Start menu below the Most used apps. Though many users won’t mind this app suggestion, but some users find it annoying and considers them as app ads. This app suggestion is based on your app usage history. So if you are one of those who feel annoyed and wants them to be removed, here’s a way to disable them.

AppAdsuggestion

To disable this app suggestion,

  • Open Settings > Personalization > Start
  • And switch off ‘Occasionally show suggestions in Start’

AppAdsuggestion1

That’s all. Now you won’t get those app suggestions.

Wednesday, July 24, 2013

How to find which codecs are installed on your PC?

Sometimes while troubleshooting Windows Media Player, you want to check which codecs are installed on your PC, you have the right codecs or not before installing the codec you need. For that how to find which codecs are already installed?

Open Windows Media Player, From the Help menu click About Windows Media Player. If Help Menu not visible, right click on top bar (below the title bar) click on Show Menu Bar. Or just press Ctrl+M.

WMP

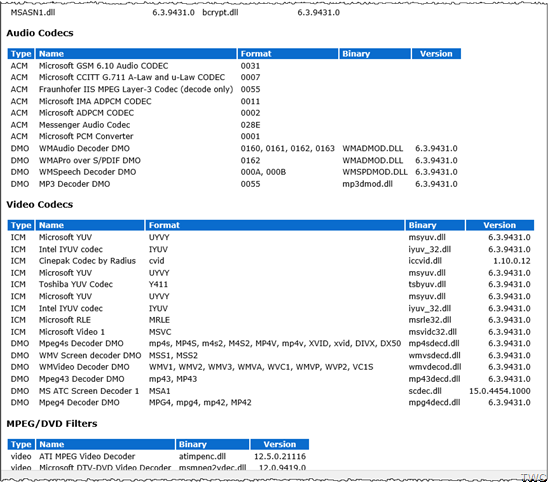
Click on Technical Support Information and it provides detailed information which includes OS info, lists Media Player and other Binaries, lists Audio codecs, Video codecs , MPEG/DVD Filters, plug-ins, services etc.

WMP1

So this way you can know the installed codecs. The screenshots are of Windows Media Player 12.0.9431.0 in Windows 8.1 Preview with Media Center.

Tuesday, July 23, 2013

How to get back Media Center after upgrading to Windows 8.1 Preview

If you were running Windows 8 Pro with Windows Media Center and you download the Windows 8.1 preview through the Windows Store, Windows Media Center will be retained and you don’t have to reinstall it. But if you have installed Windows 8.1 preview using the ISO file, Windows Media Center will be removed. So you have to reinstall it with your original Windows 8 Pro pack or Windows 8 Media Center Pack product key.

Let us see how to reinstall Windows Media Center if you are having the media center Product key.

Open Control Panel > System or you can press WinKey+Pause/Break to open System.

And click on ‘ Get more features with a new edition of Windows’

MC01

Click on I already have a product Key and enter the Media Center Pack product key when asked. It’ll check the key and will install the required feature. During the process PC will restart at least once.

After the restart if you check the Control Panel >System , your Windows edition will now be shown with Media Center

MC03

And after adding Windows Media Center your DVD playback feature too will be activated in WMP 12 , if you aren’t running any 3rd party media player.

Tuesday, July 09, 2013

[Workaround] How to Pin Windows Update to Start Screen in Windows 8.1 Preview

Since the upgrade of Windows 8 to Windows 8.1 Preview, users were having problem to pin Control Panel items like Windows Update to Start Screen. If a user right clicks any Control Panel item and click Pin to Start, nothing happens. To resolve this issue, here’s a small workaround.

1. Right click on Control Panel item and click on Create Shortcut. This will create a shortcut on the Desktop.

2. Go to desktop and Copy that shortcut to %appdata%\Microsoft\Windows\Start Menu\Programs

3. This will place the shortcut in All App screen. Just go to All app screen by clicking on the arrow at bottom left of Start Screen. And you can sort them by Date installed.

WinUpdat

And now right click on it and click on Pin To Start from the App bar below.

Now you have the Windows Update pinned to Start Screen. So from Start Screen , you can now open Windows Update.