Saturday, December 12, 2020

Windows Insiders gets the option to receive builds from the RS_PRERELEASE branch

In the earlier post about the Windows 10 Insider Preview Build 20246 release, we had seen starting with this build 20246, the name of the branch from which builds are released was changed to FE_RELEASE. Windows Insiders in Dev channel were getting builds from this branch.

And now Microsoft has released Windows 10 Insider Preview Build 20277 (FE_RELEASE) to Windows Insiders in the Dev Channel. Starting from this release, Windows Insiders in the Dev channel will also be getting the option to receive builds from the RS_PRERELEASE branch. These builds will be offered as an optional update in Windows Update. Insiders will have to go and choose to install the currently offered RS_PRERELEASE build. Once they do, they will continue to receive RS_PRERELEASE builds going forward.

So with the build 20277(FE_RELEASE), Microsoft  has also released Windows 10 Insider Preview Build 21277 (RS_PRERELEASE) to Windows Insiders in the Dev Channel. As said, it is offered as an optional update.

This optional experience for receiving RS_PRERELEASE builds is just temporary. Microsoft is planning to move all Insiders in the Dev Channel back to receiving builds from RS_PRERELEASE sometime after the holidays. Insiders who choose to stay put will continue to automatically get builds from the FE_RELEASE till all Insiders in the Dev channel will be moved to RS_PRERELEASE as said after the Holidays.

Please note that once an Insider chooses to install a RS_PRERELEASE build, they cannot move back to receiving FE_RELEASE builds as their device will be on a higher build number. Insiders will still have the option to roll back to a previous version for up to 10 days or until you take another build. 

(source)

Wednesday, November 25, 2020

Mail and Calendar gets new themes

The Mail and Calendar apps for Windows 10 gets fresh new themes.   

12 new themes in the Mail and Calendar apps have been added. This also includes 4 seasonal illustrations. These themes also come with a matching accent color and will bring a lively new look to the apps.

To try out the new themes, select Settings  > Personalization. (same for both Mail as well as Calendar)


Note: This feature is currently available only to Windows Insiders, but will coming soon for everybody.

Tuesday, November 17, 2020

Collections in Microsoft Edge - Must try feature!

Collections feature in Microsoft Edge has been designed based on what the user does on the web. If you’re a shopper, it will help you collect and compare items. If you’re an event or trip organizer, Collections will help pull together all your trip or event information as well as ideas to make your event or trip a success. If you’re a teacher or student, it will help you organize your web research and create your lesson plans or reports. Whatever you are doing on the web, Collections can help.Collections is a must try feature. Once you give it a try and you'll be using it regularly.
 
In general, Collections in Microsoft Edge helps you keep track of your ideas on the web. Collections syncs across your signed-in devices, so if you use Microsoft Edge on multiple devices, your collections will always be up to date on all of them. Let us check how to use Collections and what it can be used for: 
 
Start a new collection:  
Select Collections Collections icon at the upper-right corner of Microsoft Edge and then Start new collection.
 To change the title of the collection, select it at the top of the Collections pane.
Once you are ready, you can start adding contents to your Collections in several ways:
    Select Add current page to save an entire webpage to the collection.
    Select and drag an image into the collection.
    Select and drag a link or highlighted text into the collection.
When you add content to your collection, a card will appear. This card shows useful info at a glance and contains a link to the item you saved, so you can always get back to what you were working on.
  
Collections let you pick up where you left off :
 
 To open all the items in a collection as tabs in a new window, select Sharing and more Sharing and more icon > Open all.
Or if you are in Collections main page showing many collections, then right click on that Collection and you'll get the 'Open' option with choice.
To open an individual item in a new tab, right-click it and select Open in new tab or Open in new window.

One can reorder cards in a Collection by just selecting a card and drag it up or down in the list to move it.
 
Adding Notes to a Collection: 
To add a note to a collection, select Add note Add note icon at the upper-right corner of the Collections pane, or right-click in the pane and select Add note.
You can change the font, add bullets, or add headers using the toolbar at the top of the note. When you're ready to save the note, select SaveSave icon.
To reorder content in a collection, including notes, just select it and drag it up or down in the Collections pane.
 Please note that you can't add notes to collections on iOS or Android devices, but any notes you add on a computer will sync to your collections on a mobile device.
 
Share a collection: 
You can easily share a collection or individual items in a collection with others. 
  • To share a collection, select Sharing and more Sharing and more icon > Copy all. This copies all the cards in the collection, which you can paste into an email to share with others. 
  • To share a single item in a collection, right-click it and then select Copy to copy the card for the saved item or Copy link to copy the URL.
 Export a collection:

You can export an entire collection or individual items to a Word document or an Excel worksheet.  

To export an entire collection, select Sharing and more Sharing and more icon and then select Send to Excel or Send to Word. 

To export one or multiple items within a collection, select the check box at the upper-right corner of the item. Next, select Share Share icon and then select Send to Excel or Send to Word.

Similarly these features are also available on iOS and Android. Check for details for these features in iOS , Android device,here.

Check this video : This video will show how easy it is to use Collections and how useful it is.

Sunday, November 15, 2020

How to record your screen in PowerPoint?

Few days back, a tweet from Jen Gentleman, community manager at Microsoft, asking "Do you know you can record your screen using PowerPoint?" evoked lots of responses. And all were eager to know how to do this? So I thought as so many PowerPoint users are interested, why not post about this feature.

How to record your computer screen in PowerPoint?

You can record your computer screen and related audio, and then embed it in your PowerPoint slide or you can save it as a separate file. Let us check the steps: 

  • Open the PPT slide that you want to put the screen recording.
  • On the Insert tab of the ribbon, select Screen Recording.
  • On the Control Dock, click Select Area (Windows logo key+Shift+A), or, if you want to select the entire screen for recording, press Windows logo key+Shift+F.

    The Windows logo key+Shift+F keyboard shortcut is only available if you have an Office 2016   Click-to-Run installation; MSI-based installations don't have the shortcut.
If you have opted to select an area, you see the cross-haired cursor Cross haired cursor . Click and drag to select the area of the screen you want to record. (If you have already done a screen recording during your current PowerPoint session, your prior area selection will appear on the screen. You can proceed with recording if that selection area suits you, or you can click Select Area to start over.) 

PowerPoint automatically records the audio and the mouse pointer, so by default those options are selected on the control dock. To turn them off, deselect Audio (Windows logo key+Shift+U) and Record Pointer (Windows logo key+Shift+O).

  •  Click Record (Windows logo key+Shift+R).Unless you pin the Control Dock to the screen, it will slide up into the margin while you record. To make the unpinned Control Dock reappear, point the mouse cursor at the top of the screen.
  • To control your recording:
    •  Click Pause to temporarily stop the recording (Windows logo key+Shift+R).
    •  Click Record to resume recording (Windows logo key+Shift+R).
    •  Click Stop to end your recording (Windows logo key+Shift+Q) (shown below).

  • When you are finished recording, save your presentation: File > Save. The recording is now embedded on the slide you selected. To save the recording itself as a separate file on your computer, right-click the picture on the slide that represents the recording, and select Save Media as. In the Save Media As dialog box, specify a file name and folder location, then click Save.

To set your video 'Start' settings, right-click the video frame, click Start, and pick how you want your video to start in your presentation; automatically when a slide appears, or when you click the mouse.

To Trim your video,Right-click the video frame, and click Trim.To determine where you want to trim your video footage, in the Trim Video box, click Play.When you reach the point where you want to make the cut, click Pause. Use the Next Frame and Previous Frame buttons to specify precise timing. To trim the beginning of the clip, click the start point, when you see the two-headed arrow, drag the arrow to the desired starting position for the video. Similarly, to trim the end of the clip, click the end point, when you see the two-headed arrow, drag the arrow to the desired ending position for the video. Click OK.

To apply a style to the video frame, right-click the video frame, click Style, and pick a style you like.

 If you are running older version of Office, like Office 2013, please check the source for the steps.

Saturday, October 31, 2020

Windows 10 Insider Preview Build 20246 released

Windows 10 Insider Preview Build 20246 has been released on 29th Oct. to Windows Insiders in the Dev Channel. This post is just to highlight the change of branch from which the builds are released.

FE_RELEASE branch: Starting with this build, the name of the branch from which builds are released has changed to FE_RELEASE. As a result of the switch to the FE_RELEASE branch, some features like the updated emoji picker, redesigned touch keyboard, voice typing, theme-aware splash screens, and others have been removed temporarily.These features will be brought back to Insiders soon in the future release. Also builds from the FE_RELEASE branch are not matched to a specific Windows 10 release.

Other updates:

  • The preview experience of the Calendar app will be removed in an upcoming update and return to its classic look and feel. Windows Insiders will get a pop-up notifying them of the changes to the preview experience.
  • Automatic Linux distro installation has been added to the wsl.exe --install command! 
    Users who wish to install the Windows Subsystem for Linux quickly can just type in wsl.exe –install into the command line and then will have a fully set up WSL instance ready to go, including their Linux distro of choice.
Apart from updates, many issues have been fixed.For a complete list please check the source.

 6th Anniversary badge: For celebrating Windows Insider Program's 6th anniversary, Microsoft has released a special anniversary badge to all Windows Insiders. 

To check if you have received or not, just goto Feedback hub> achievements .

Tuesday, October 27, 2020

Windows 10 Emoji Picker gets an update (Build 20206)

Microsoft has been evolving and improving the Emoji Picker over the years. Emoji picker added more emoji, added support for many other languages, kaomoji and symbols.


Now with the release of Windows 10 Insider Preview Build 20206, emoji picker has been revamped with more new additions. 

  • Updated Design: Emoji picker gets a new acrylic background thus making it more aligned with the Fluent Design principles.
  • Emoji Search: Search has been improved by adding an inline search box in supported languages.
  • Animated GIF support: Now one can quickly add animated GIFs too.And the emoji search also supports these animated GIFs. Selection of animated GIFs will be continuously updated based on current trends and hashtags.
    NOTE: In order to insert an animated GIF when typing, the text field needs to support it. Animated GIF search requires an internet connection
  • Input and clipboard history brought together: Input and clipboard history are brought together into a single experience.One can still press WIN + V to go straight to clipboard history, but now you can also access it by switching to the “Clipboard” category after pressing WIN + [.] or WIN + [;].

 This feature is rolling out to a subset of Insiders in the Dev Channel at first and will be gradually rolled out to everyone in the Dev Channel.


Monday, October 26, 2020

What’s new in the Windows 10 October 2020 Update

As we have seen in previous post, Windows 10 October 2020 Update (version 20H2) has started to become available to customers as a free update. Let us check its features and improvements coming with the Windows 10 October 2020 Update. Many of the features are requested features from users making experience on Windows even better. This update also contains all features and fixes included in previous cumulative updates to Windows 10, version 2004.

Microsoft Edge:  

  • This release automatically includes the new Chromium-based Microsoft Edge browser instead of the legacy version of Edge. If you already been using the new Edge browser, must have seen the new Collections feature where you can save and share content you find online. Now the Price Comparison feature too is added. Though this feature is available for limited sites at present but still very useful for comparing prices across various sites.


  •  Alt+Tab: With this handy keyboard shortcut not only can you easily access the apps you have open on your desktop, but now you can also access your open tabs in Microsoft Edge.
  •  See all the open tabs: If you’re someone who likes the convenience of pinning your favorite websites to the taskbar, you’re going to love this new feature. Now when you hover over the website icon, you’ll see all the open tabs of that site.

Start menu, taskbar & others gets refreshing updates:

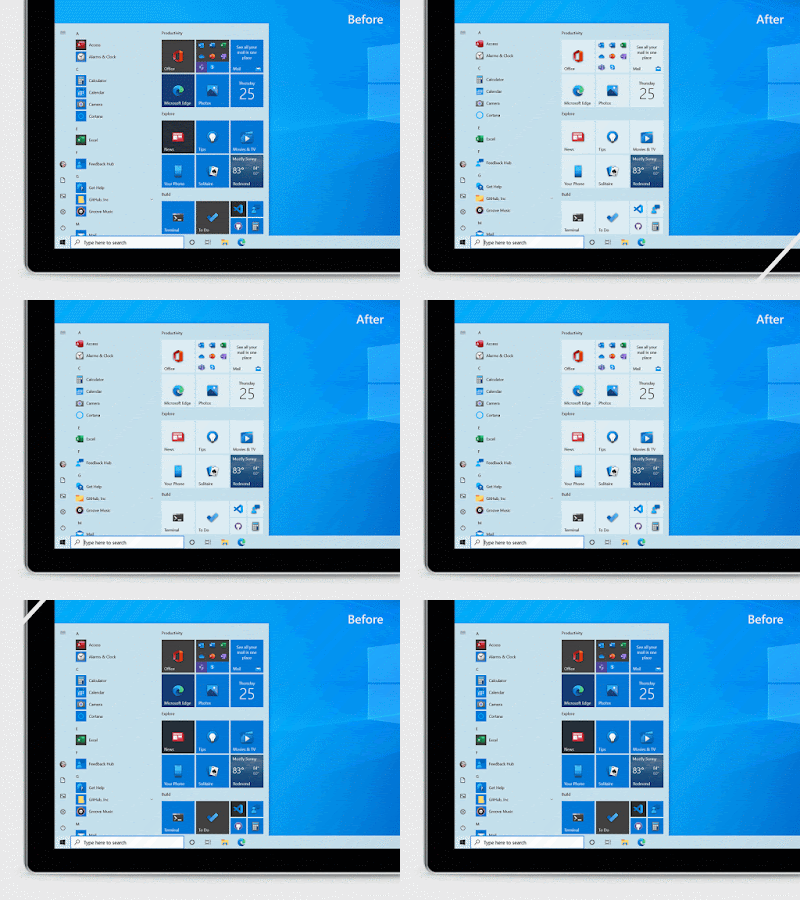
  • Start menu gets a refined design. A uniform, partially transparent background to the tiles creates a beautiful stage for the redesigned app icons like Calculator, Mail and Calendar. This new design looks great both in light and dark themes. First make sure to turn on Windows dark theme and then toggle “Show accent color on the following surfaces” for “Start, taskbar, and action center” under Settings > Personalization > Color to elegantly apply your accent color to the Start frame and tiles.

  • A taskbar specifically curated, more personalized with less clutter, more content. This is limited to new account creation or first logon scenarios.
  • Settings continues to become a more robust place to access security and device details. Now you can change the refresh rate of your display from Settings > System > Display, Advanced display settings. 
  • 2-in-1 devices now naturally switch by default to the new tablet experience without the notification toast asking you to switch into the tablet mode when you detach the keyboard.
  • New app logos at the top of notifications now make it much easier to identify who they are from. And the new “X marks the spot” lets you quickly click, close and get back at it.
For more details and information on updates for commercial and education customers, please check the source