Showing posts with label Windows 10. Show all posts

Saturday, August 15, 2020

What is Windows 10 S mode?

Windows 10 in S mode is a version of Windows 10 that's streamlined for security and performance, while providing a familiar Windows experience. Many of the PCs come with version of Windows 10 in S mode preinstalled.

Windows 10 in S mode works exclusively with apps from the Microsoft Store within Windows and accessories that are compatible with Windows 10 in S mode. That means you can install apps only from Windows Store and won't be able to install apps or software from other sources. To increase security, it allows only apps from the Microsoft Store, and requires Microsoft Edge for safe browsing.

You can't even run command line commands. So in a way it''ll protect your PC by running only verified apps from the Store. What actually is Windows 10 in S mode? Let us check some of the FAQs regarding the same.

  • How do I get Windows 10 in S mode?
    To get Windows 10 in S mode, you need the right volume license agreement and qualifying devices that are already enabled in S mode. Or you can work with the manufacturer or partner to get it installed when you buy a new device.
  • How did Windows 10 S change with the release of the April 2018 Update for Windows 10?
    With the April 2018 Update, Windows 10 S became a mode of Windows 10 (called “S mode”). It's now available in Windows 10 Home edition, Windows 10 Pro, and Windows 10 Pro Education—and you can buy new PCs with an edition of the S mode preinstalled. If you have an existing Windows 10 S device and you install the April 2018 Update or later, you'll have a Windows 10 Pro device in S mode.
  • What kind of processor does Windows 10 in S mode run on?
    Windows 10 in S mode can come installed on a PC that has an Intel, AMD, or Qualcomm Snapdragon processor.
  • What apps can I use on a PC that's running Windows 10 in S mode?
    You can download and install apps from the Microsoft Store in Windows.
  • Can I set Google Chrome or Firefox as my default web browser when I'm using Windows 10 in S mode?
    No. When you're using Windows 10 in S mode, Microsoft Edge is always the default web browser, and Bing is the default search engine. But you can access other browsers and search engines while in S mode. You can download any browser available in the Microsoft Store in Windows, and you can navigate to any other search engine website.If you want to download a browser (or any other application) that's not in the Microsoft Store, you'll need to permanently switch out of S mode. 
  • How do I switch out of S mode?
    To increase security and performance, Windows 10 in S mode runs only apps from the Microsoft Store. If you want to install an app that isn't available in the Microsoft Store, you'll need to permanently switch out of S mode.Switching out of S mode is one-way. If you make the switch, you won't be able to go back to Windows 10 in S mode.There's no charge to switch out of S mode, but you won't be able to turn it back on. If you're blocked from switching and your device belongs to an organization, check with your administrator. Your organization can choose to keep all devices in S mode.

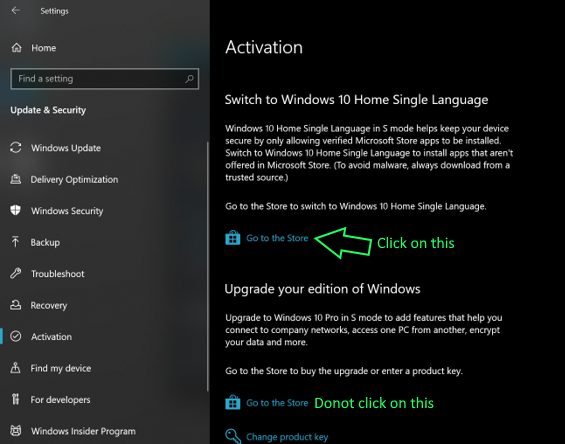
    On your PC running Windows 10 in S mode, open Settings  > Update & Security  > Activation.

    Find the Switch to Windows 10 Home or Switch to Windows 10 Pro section, then select the Go to the Store link.

    Note: Don't select the link under Upgrade your edition of Windows. That's a different process that will keep you in S mode.

    On the page that appears in the Microsoft Store (Switch out of S mode or a similar page), select the Get button. After you confirm this action, you'll be able to install apps from outside the Microsoft Store.

  • How do I switch back to S mode?
    Switching out of S mode is one-way. If you switch out of S mode, you'll need to keep using the standard version of Windows 10.
As per this Switching out of S mode will not affect the warranty of your device. Still one can check with their device manufacturer before switching out of S mode. For more details about S mode on various processors, specially  Qualcomm Snapdragon processor, please check this source.

Sunday, February 16, 2020

[Tip]: Copy images and text from one PC to another with a cloud-based clipboard.

Its already been sometime since Clipboard history feature in Windows 10 was provided. I'm mentioning this feature tip again because many Windows 10 users didn't knew about this Clipboard history.
When you copy or cut in Windows 10, it's copied to the clipboard for you to paste. Now with the October 2018 Windows update, Windows 10 supports multiple items to be saved to the clipboard to use it later. And its a cloud based clipboard. So you can copy images and text from one PC to another with a cloud-based clipboard. Not only can you paste from your clipboard history, but you can also pin the items you find yourself using all the time.

1. To get to your clipboard history at any time, press Windows logo key  + V. You can also paste and pin frequently used items by choosing an individual item from your clipboard menu.
2. To share your clipboard items across your Windows 10 devices, select Start  > Settings  > System > Clipboard. Choose Automatically sync text that I copy under Sync across devices. The sync feature is tied to your Microsoft account, or your work account, so remember to use the same login information on all your devices. 


Your clipboard history is limited to 25 copied entries. Older itemsunless they're pinnedare removed automatically to make room for new clipboard items.

Here are some FAQs about the Clipboard:
How do I turn on my clipboard history for the first time?
To turn your clipboard on for the first time, select Windows logo key + V, and then select Turn on.
 
How do I sync my clipboard items to my PC?
To turn on the sync feature, select Start  > Settings  > System  > Clipboard . Choose On under Sync across devices.
 
How do I clear my clipboard history?
To clear everything—except pinned items—on your device and the cloud, select Start  > Settings  > System > Clipboard  > Clear clipboard data > Clear.
You can also clear your device clipboard history by selecting Windows logo key  + V  and then selecting the Clear all option at the top.
 
How do I clear an individual item I don't want to show up in the clipboard history anymore?
To clear an item on your clipboard, open your clipboard by selecting Windows logo key  + V, and then next to the item in question, select Delete.
 
How do I sync my clipboard to my phone?
You can't sync your clipboard history to your phone yet, but that feature is coming soon.

Monday, November 18, 2019

Tip: Color Filters for the color blind

Some people have difficulty in distinguishing colors or may be color blind. For those Windows 10 has an option which can help make the colors on your screen more distinct. its the Color Filters feature. 

If it's hard to see what's on the screen, apply a color filter. Color filters change the color palette on the screen and can help you distinguish between things that differ only by color.
It can be found under Settings > Ease of Access

To use a color filter:
  • Select Start  > Settings  > Ease of Access > Color filters.
  • Switch on the toggle under Turn on color filters.
  • Then, select a color filter from the menu. Try each filter to see which one suits you best 
    Note: To get to color filter settings in previous versions of Windows 10, select Start  > Settings  > Ease of Access > Color & high contrast.

    Thanks to Jen Gentleman for the twittertip & (source)


Tuesday, May 14, 2019

PowerToys coming back as opensource with Windows 10 support

If you are one of those who have used Windows 95, then you must be familiar with the very popular PowerToys set of tools. The PowerToys project was originally launched for Windows 95. It had a set of very useful utilities to make Windows 95 ‘s user work efficiently. Most famous was TweakUI, which would tweak Windows 95 with an easy interface instead of digging into Registry. Many Windows 95 users had the opinion that what PowerToys had brought should have been in Windows 95 to begin with. With a size of just 205 KB to download and with over a dozen enhancements, it was very popular.
Inspired by Windows 95 era PowerToys project, these are being brought again as opensource and with Windows 10 support. So this reboot will provide Windows 10 power users with ways to squeeze more efficiency out of Windows 10 shell and customize it.
The first preview of these utilities and corresponding source code will be released in Summer 2019.
Now as an opensource, 2 utilities are being worked out first:
  • Maximize to new desktop widget - The MTND widget shows a pop-up button when a user hovers over the maximize / restore button on any window. Clicking it creates a new desktop, sends the app to that desktop and maximizes the app on the new desktop.
  • Windows key shortcut guide - The shortcut guide appears when a user holds the Windows key down for more than one second and shows the available shortcuts for the current state of the desktop.
This opensource project welcomes contributions and suggestions.
For more details, please check GitHub

Tuesday, April 30, 2019

Upgrade block list for Windows 10 May 2019 Update (19H1)

Windows 10 May 2019 Update will be made available in late May for commercial customers on a currently supported version of Windows 10 who seek to update via “Download and install now (”limited to devices with no known compatibility issues). A phased rollout using ML model* will start to intelligently target those devices running Windows 10, version 1803 or prior versions that Microsoft’s data and feedback predict will have the best update experience.

Upgrade blocks for the May 2019 Update (19H1) :
Recently Microsoft has released a list of Upgrade Blocks for the May 2019 Update. So one must be aware if he’s having any issues when this update is made available.
  • If you have an external USB device or SD memory card is attached to your PC, you will be blocked from updating to the May 2019 Update. If you remove any external USB devices and/or SD memory cards, the update should proceed normally. This issue will be resolved in a future servicing update for Windows 10. For Windows Insiders, this issue is resolved in Build 18877 and later builds.
Windows Insiders who are trying to upgrade to the May 2019 Update may experience an upgrade block and receive the following error:
"This PC can't be upgraded to Windows 10"

Example: An upgrade to the May 2019 Update is tried on a computer that has a thumb drive inserted into a USB port. Before the upgrade, the device would have been mounted in the system as drive G based on the existing drive configuration. However, after the upgrade, the device is reassigned a different drive letter. For example, the drive is reassigned as drive H.
Note The drive reassignment is not limited to removable drives. Internal hard drives can also be affected.

Workaround: To work around this issue, remove all external media, such as USB devices and SD cards, from the computer. Then, restart the May 2019 Update installation


  • If you have older versions of anti-cheat software used with games installed on your PC, you will be blocked from updating to the May 2019 Update. Some older versions of anti-cheat software may cause PCs to experience crashes after updating to the May 2019 Update. This block is specific to older versions of anti-cheat software. Microsoft is working with partners on getting their software updated with a fix, and most games have released patches to prevent PCs from experiencing this issue. To minimize the chance of hitting this block, please make sure you are running the latest version of your games before attempting to update the operating system.
  • If you have redirected any Known Folders (for example: Desktop, Documents, Pictures), an empty folder with that same name is created in your %userprofile% directory when you update. Your Known Folders are redirected if you chose to back up your content to OneDrive using the OneDrive wizard, or if you chose to keep your content backed up during the Windows Out-of-box-Experience (OOBE). You may have also redirected your Known Folders manually through the Properties Dialog in File Explorer. ​This issue does not cause any user files to be deleted and a fix is in progress.
So keep these upgrade blocks in mind before installing Windows 10 May 2019 update
*(check this for more details on Next generation of ML-based intelligent rollout)

Saturday, March 30, 2019

[Tip]: Grammar tools in Microsoft Edge

Microsoft Edge is the only browser that comes with Microsoft Learning Tools built-in that helps in to to improve reading and focus. Grammar tool is part of that Learning tool. With Grammar tool, you can identify parts of speech with different colors.
Grammar tools can separate words into syllables and highlight parts of speech, such as nouns, verbs and adjectives. Along with highlighting parts of speech, you can now also change the color as well as turn on an indicator right over what you’ve highlighted, making it much easier to identify the part of speech.
How to enable & use Grammar tools?
Microsoft Edge comes with a Reader mode which strips out unnecessary elements from the opened web page and turns it into cleaner looking page without any ads or scripts, which makes it easier to read and focus on the content.
  • Open the desired web page in Microsoft Edge.
  • Click on the Reading View icon or Ctrl+Shift+R is the keyboard shortcut.
  • This will enable the Reading View feature in the Microsoft Edge. (The opened page should support the Reading view feature. If the Reading View button is not available & is grayed out, it means that the current web page does not support reading view.)
  • Now to get Reading View’s options toolbar, click on the empty area of the page or press Ctrl+Shift+O. Now you can see a toolbar.
  • Click on Learning Tools. Then Click on Grammar tools. The Grammar tools is not installed by default. So if you are using it for 1st time, you’ll see Get button else if its already downloaded & installed , you’ll not see the Get button.
  • Clicking on installed Grammar tools, you’ll see various options.
  • You can enable or disable the grammar tools syllables and highlight parts of speech, such as nouns, verbs and adjectives according to your preferences.One can show the labels too.
As said earlier, Grammar tools separates words into syllables and highlight parts of speech, such as nouns, verbs and adjectives. Check it out in action:


Saturday, March 16, 2019

Phone Screen – Access your phone apps on your PC

With release of Windows 10 Insider Preview Build 18356 (19H1), an early preview of a new feature Phone Screen is being provided. You can now mirror your Android phone’s screen directly on your PC without having to dig for your phone.

This new feature of Phone Screen provides access to your phone apps on your PC. So one can use phone apps from the comfort of their PC without having to take out the phone. This feature will be rolled out gradually and will show up inside the Your Phone app (ver 1.0.20701.0 and above)
Phone Screen requirement:
Supported PCs:
You can use the Your Phone app on any Windows 10 PC running Windows builds 1803 or newer and any Android phone running Android version 7.0 or newer. The new Phone Screen feature requires you to be running the latest Insider builds (1903) and is initially only compatible with a limited set of devices. Your PC also needs to support Bluetooth with Low Energy Peripheral mode. Android phone must be on, within Bluetooth range of the PC, and connected to the same network as the PC.
How to check if your PC supports Bluetooth Low Energy Peripheral Role?
  • Open Device Manager by right-clicking on the Start menu.
  • Select and expand the Bluetooth option.
  • Select the Radio Driver or Adapter for Bluetooth.
  • Double click to open Properties.
  • Navigate to the Details tab.
  • Find the “Bluetooth radio supports Low Energy Peripheral Role” property on the dropdown and select it.
  • See if the value is true or false.
  • If it’s “true” then your PC will be able to display your phone screen and interact with it.
Supported Phones:
Currently the feature is only available on the following select Android phones running Android 7.0 or greater:
  • Samsung Galaxy S8
  • Samsung Galaxy S8+
  • Samsung Galaxy S9
  • Samsung Galaxy S9+
List of devices over time will be expanded for both the PC and phone.


Sunday, February 24, 2019

Access Linux files from Windows

Windows 10 Insider Preview Build 18342 has been released recently and many new features have been added with it. Among them is one of the most requested feature of accessing all the files in your Linux distros from Windows.
Earlier creating, changing Linux files from Windows resulted in losing or corrupting of files. Now this has been made possible to access Linux files from Windows without corruption. These files can be accessed through the command line, and also Windows apps, like File Explorer, VSCode, etc. can interact with these files.Access your files by navigating to \\wsl$\<distro_name>, or see a list of running distributions by navigating to \\wsl$.
Just for info: Why is the WSL resource name in the filepath called wsl$?
“Since wsl is a short acronym we realize that some resources on networks may already have that name. So we’ve added a dollar sign, since a machine name can’t have a dollar sign in it, which ensures that the name will be accessible with any existing network configuration.”
Accessing via File Explorer:
Try opening your Linux files in Explorer. To do this, open your favorite distro, ensure your current folder is your Linux home directory and type in explorer.exe . This will open a File Explorer window, located inside of your Linux distro.

So from here, you can access whatever Linux files you want, just like you do for any other file through File explorer. You can also do operations like dragging files back & forth to other locations, can copy and paste. One can also even use the context menu.

When using this feature as said above, you’ll notice the distro files are exposed through the path: \\wsl$\<running_distro_name>\. This is due to the way Windows accesses the files inside of each distro. This will be improved by the WSL team.
Accessing via Command line:
WSL is primarily a command line tool, and so of course this feature also works in the command line. You can find your distro’s files by accessing \\wsl$\{distro name}\ where {distro name} is the name of a running distro.

Here Debian is accessed with PowerShell
Since its a new feature, there might be some issues. Some of these known issues are:
  • As of now, the distros files will only be accessible from Windows when the distro is running. In future non-running distros too will be supported.
  • Accessing Linux files is treated the same as accessing a network resource, and any rules for accessing network resources will still apply
    e.g: When using CMD, cd \\wsl$\Ubuntu\home will not work (as CMD does not support UNC paths as current directories), however copy \\wsl$\Ubuntu\home\somefile.txt C:\dev\ will work
  • You should NOT access your Linux files inside of the AppData folder!
    If you try to access your Linux files through your AppData folder, you are bypassing using the 9P server, which means that you will not have access to your Linux files, and you could possibly corrupt your Linux distro.
For more details check source.

Saturday, February 09, 2019

Improve RAW image format support with Raw codec package from Microsoft

For those who like taking photos in Raw image formats and wants Raw files from your camera were natively supported by Windows, here’s a Raw codec package from Microsoft.
Microsoft has been working on a new store-delivered Raw codec package which dramatically improves native raw file format support in Windows.

By downloading this and installing this new Raw Image Extension Beta package from the Store, one can view image thumbnails, previews and camera metadata of previously unsupported raw files right in File Explorer. You can also view your raw images – at full resolution – in apps such as Photos or any other Windows app that uses Windows Imaging Component framework to decode raw images.
Open the following link to install the current beta package:
Please note you will require Window 10 Build 18323 19H1 or later to install this package.

Saturday, January 26, 2019

How to enable Reserved Storage?

With the release of the latest Windows Insider Build 18298, Microsoft has made some changes to how Windows 10 manages disk space. And this new feature is being called Reserved Storage. Through reserved storage, some disk space will be set aside to be used by updates, apps, temporary files, and system caches. The aim is to improve the day-to-day function of your PC by ensuring critical OS functions always have access to disk space. Without reserved storage, if a user almost fills up her or his storage, several Windows and application scenarios become unreliable. Windows and application scenarios may not work as expected if they need free space to function. With reserved storage, updates, apps, temporary files, and caches are less likely to take away from valuable free space and should continue to operate as expected.
Reserved storage will be introduced automatically on devices that come with version 1903 pre-installed or those where 1903 was clean installed. You don’t need to set anything up—this process will automatically run in the background.

How Reserved Storage works?

When apps and system processes create temporary files, these files will automatically be placed into reserved storage. These temporary files won’t consume free user space when they are created and will be less likely to do so as temporary files increase in number, provided that the reserve isn’t full. Since disk space has been set aside for this purpose, your device will function more reliably. Storage sense will automatically remove unneeded temporary files, but if for some reason your reserve area fills up Windows will continue to operate as expected while temporarily consuming some disk space outside of the reserve if it is temporarily full.
During an update, the temporary OS files which are not needed in the reserved storage will be deleted and so the update will use the full reserve area. This will enable most PCs to download and install an update without having to free up any of your disk space, even when you have minimal free disk space. If the update requires more space than reserved, it will automatically use other available free space. And even that is not enough then Windows will prompt you through steps to temporarily extend your hard disk with external storage, such as with a USB stick or will prompt the user how to free up disk space.

How much Storage space will be reserved?

Its being anticipated that with the next major Windows release (19H1), the Reserved Storage will start from 7GB, though amount of reserved space will vary over time based on how you use your device. Microsoft may adjust the size of reserved storage in the future based on diagnostic data or feedback.The reserved storage cannot be removed from the OS, but you may be able to reduce the amount of space reserved by removing unused optional features and languages.
How to reduce the Reserved Storage space?
Following two factors influence how reserved storage changes size on your device:
Optional features: When an optional feature is installed, Windows will increase the amount of reserved storage to ensure there is space to maintain this feature on your device when updates are installed. You can reduce the amount of space required for reserved storage on your device by uninstalling optional features you are not using.
Installed languages: When additional languages are installed, Windows will increase the amount of reserved storage to ensure there is space to maintain these languages. You can reduce the amount of space required for reserved storage on your device by uninstalling languages you aren’t using.
As said earlier, Reserved Storage will be introduced automatically on devices that come with version 1903 pre-installed or those where 1903 was clean installed.
To check the reserved storage size or to see if its there,
Click the Start Windows icon > Settings > System > Storage .
Click Show more categories > System & reserved.
Look at the Reserved storage size; the value should be non-zero.

If you are not seeing/using the Reserved Storage then follow these steps: (For Windows Insiders)
  • Open Registry Editor.
  • Select HKEY_LOCAL_MACHINE\SOFTWARE\Microsoft\Windows\CurrentVersion\ReserveManager
  • Right click ShippedWithReserves to modify and update the value to “1”
  • After you upgrade the device to the next available build, you will be using reserved storage!
(Source and Feedback Quest)


Sunday, December 23, 2018

What is Windows Sandbox?

With Windows 10 Insider Preview Build 18305, Windows Sandbox is introduced. Windows Sandbox is a new lightweight desktop environment meant for safely running applications in isolation.
Many a times we download an executable file but are unsure whether it’ll be safe to run it or not. For this Microsoft has developed Windows Sandbox. its an isolated, temporary, desktop environment where you can run untrusted software without the fear of lasting impact to your PC. Any software installed in Windows Sandbox stays only in the sandbox and cannot affect your host. Once Windows Sandbox is closed, all the software with all its files and state are permanently deleted.
Features of Windows Sandbox:
  • Part of Windows: Everything required for Windows Sandbox comes with Windows 10 Pro and Enterprise. Downloading VHD is not required.
  • Pristine: Every time Windows Sandbox runs, it’s as clean as a brand-new installation of Windows.
  • Disposable: Nothing persists on the device; everything is discarded after you close the application.
  • Secure: Uses hardware-based virtualization for kernel isolation, which relies on the Microsoft’s hypervisor to run a separate kernel which isolates Windows Sandbox from the host.
  • Efficient: uses integrated kernel scheduler, smart memory management, and virtual GPU.
Installing Sandbox:
  • Install Windows 10 Pro or Enterprise Insider Build 18305 or newer.
  • Enable Virtualization :
    • If you are using a physical machine, ensure virtualization capabilities are enabled in the BIOS.
    • If you are using a virtual machine, enable nested virtualization with this PowerShell cmdlet: Set-VMProcessor -VMName <VMName> -ExposeVirtualizationExtensions $true
  • Go to Settings > Apps > Apps & Features > Programs and Features > Turn Windows Features on or off, and then select Windows Sandbox. You might be asked to restart the computer.
  • Using the Start menu, find Windows Sandbox, run it and allow the elevation
  • Copy an executable file from the host
  • Paste the executable file in the window of Windows Sandbox (on the Windows desktop)
  • Run the executable in the Windows Sandbox; if it is an installer go ahead and install it
  • Run the application and use it as you normally do
  • When you’re done experimenting, you can simply close the Windows Sandbox application. All sandbox content will be discarded and permanently deleted.
Prerequisites for using Windows Sandbox:
  • Windows 10 Pro or Enterprise Insider build 18305 or later
  • AMD64 architecture
  • Virtualization capabilities enabled in BIOS
  • At least 4GB of RAM (8GB recommended)
  • At least 1 GB of free disk space (SSD recommended)
  • At least 2 CPU cores (4 cores with hyperthreading recommended)
Windows Sandbox internals:
Windows Sandbox is built on the technologies used within Windows Containers. Windows containers were designed to run in the cloud. So taking that technology, it was integrated with Windows 10 and built features that make it more suitable to run on devices and laptops without requiring the full power of Windows Server.
So if you are interested, install and try running applications in Windows Sandbox.
For some known issues, please check this.
For more details on Sandbox internals, please check source.

Friday, December 14, 2018

Quick unpin for groups, Console updates, Notepad updates in Build 18298

With the release of Windows 10 Insider Preview Build 18298 (19H1), many new features have been added.
  • Sign-in options settings page has been simplified thus increasing visual clarity and improving ease of use. Also now from this settings page, one can now setup a security key. 
  • File Explorer icon has been updated to make it look better with the new light theme.
  • Ability to unpin groups and folders in Start via new context menu entry has been added.
  • With this build, when you open the properties page of any Console window, now one can notice an additional “Terminal” tab having many new settings.
Notepad improvements:
  • Significant improvements have been made in how the Notepad handles encoding. Now an option has been added to save files in UTF-8 without a Byte Order Mark. Additionally, a column is added to the status bar that displays the encoding of the document.
  • Notepad will now also show an asterisk (*) in the title bar before the title of a document to indicate that a document has unsaved changes.
  • Also “Send Feedback” option has been added within Notepad. Just Click Help > Send Feedback to open the Feedback Hub with the Notepad category selected and get your feedback directly to the product team.
  • support for some additional shortcuts added:
    • Ctrl+Shift+N will open a new Notepad window.
    • Ctrl+Shift+S will open the Save as… dialog.
    • Ctrl+W will close the current Notepad window.
  • Notepad can now open and save files with a path that is longer than 260 characters, also known as MAX_PATH.
  • a bug is fixed where Notepad would count lines incorrectly for documents with very long lines.
  • A bug is fixed where, when you select a placeholder file from OneDrive in the File Open dialog, you would download the file to determine its encoding.
  • fixed a recent regression where Notepad would no longer create a new file when launched with a file path that didn’t exist.
For many other improvements added in the Build  18298, please check the source.

Saturday, November 03, 2018

Indic Phonetic keyboards for Hindi and other Indian languages now available for PC

This must interest those who write in an Indic language. With release of Windows 10 Insider Preview build 18272, support for Indic Phonetic keyboards have been added. In addition to the Indic Traditional INSCRIPT keyboards already available, with this build Indic Phonetic keyboards for Hindi, Bangla, Tamil, Marathi, Punjabi, Gujarati, Odia, Telugu, Kannada and Malayalam have been added.
So with this support, as you type, it gets transliterated to suggested possible Indic text. For example, if you typed “namaste” using the Hindi Phonetic keyboard it would suggest नमस्ते, as you can see in the below gif:

One having knowledge of any of the above stated languages can try with either the hardware or touch keyboard.
Here are the steps to get started:
  1. Select Start > Settings > Time & Language-> Language from the navigation menu.
  2. Select the + icon labeled [Add a preferred language] (or skip ahead to step 4 if your preferred Indic language was already added).
  3. Type the name of an Indic language into the search box and select it – for example “Hindi”. Click the Next button and install the Indic language on your device, which will return you to the Language page.
  4. Now back on the Language page, click the one you just added, and then click the Options button. This will take you to that language’s options page.
  5. Select the + icon labeled [Add a keyboard].
  6. Enable the Phonetic keyboard, for example [Hindi Phonetic – Input method editor] – now the languages options page will look something like this:

      7.Click input indicator on the taskbar (or press the Windows key + Space) and select the Indic Phonetic keyboard. Time to type something!
Note: The dictionaries used for the Indic Phonetic keyboards need to be downloaded. Right after adding the keyboard, please connect to Internet – you may need to wait a bit for the dictionary download to finish.

Saturday, October 20, 2018

Build 18262 : More preinstalled apps gets ability to uninstall via context menu

In Windows 10 Insider Preview Build 18262 , ability to uninstall more pre-installed apps has been added. Following preinstalled Windows 10 inbox apps can be uninstalled via the context menu on the Start menu All Apps list:

  • 3D Viewer (previously called Mixed Reality Viewer)
  • Calculator
  • Calendar
  • Groove Music
  • Mail
  • Movies & TV
  • Paint 3D
  • Snip & Sketch
  • Sticky Notes
  • Voice Recorder

Earlier in the Windows 10 Oct. 2018 Update, only the following inbox apps could be uninstalled via the context menu on the Start menu All Apps list:

  • Microsoft Solitaire Collection
  • My Office
  • OneNote
  • Print 3D
  • Skype
  • Tips
  • Weather

Saturday, September 08, 2018

Send SMS from your PC, stay connected with Your Phone app

Now you don’t need to search your phone to send SMS / text messages. Let it be in your pocket, in bag, on your desk or in your purse. Your Phone app gives you instant access to your most recent photos and texts from your Android phone. Your Phone app now allows to text your friends, group message and all this using your PC keyboard.
Your Phone app allows you to view, send, and receive the SMS from your Android, on your computer.

As mentioned earlier, one can type with a keyboard for sending messages. And on pen-capable devices, one can use digital pen to ink a message and see your ink gets converted to text and send. Or one can try using just your voice to dictate a message (US English only at this time) . Press Winkey + H to start dictation. On a touch keyboard, select the microphone button.
You must link your Android phone to your computer through Your Phone app. You will receive an app from Microsoft, which you must download to your mobile phone and follow the setup prompts. Android 7.0+ are compatible with Your Phone app. For iPhone users, Your Phone app helps you to link your phone to your PC.
Requirement:
  • A mobile phone running Android 7.0 (Nougat) or later
  • A PC running Windows 10 April 2018 Update (Version 1803) or later
Check this for all the FAQs on Your Phone.

Saturday, July 28, 2018

[Windows Insiders] – What is Skip Ahead?

Windows Insiders at present have an option to choose Skip Ahead apart from Fast and Slow. Recently Windows 10 Insider Preview Build 17723 (RS5) was released to Windows Insiders in the Fast ring and Build 18204 (19H1) to Windows Insiders who have opted in to Skip Ahead.
What is Skip Ahead?
Windows Insiders will get RS5 builds from the RS5_RELEASE branch. While those Insiders who have opted for “Skip Ahead” will get 19H1 builds that will be coming from the RS_PRERELEASE branch. The branch name can be seen in the watermark at the lower right of their desktop. At present, the builds from these branches are largely the same. The below graphic will explain What Skip Ahead is:

Saturday, June 30, 2018

Non-admin users can install Fonts

When you have an account on a shared school or work PC and wanted to install and use your own fonts but couldn’t  as you don’t have the admin privileges which are required to install fonts. After getting the feedback, Microsoft has made some changes to this.
Earlier Windows Fonts were to be installed for all users. It being system-wide change, it always required admin privilege.In the file explorer, when you right click the folder containing Font file to bring up the context menu, then the “Install” option would appear with the security badge meaning it requires an admin to do it.
Earlier Microsoft introduced fonts in the Microsoft Store in the Windows 10 1803 feature update. So it needed deep changes in Windows to allow a font to be installed by a specific user rather than system-wide. So no admin action is needed when fonts acquired in the Store are installed.
Microsoft has extended this further to include font files obtained by a user from other sources and want to install. Now when you right-click on a font file in File Explorer, you’ll see two options. “Install for all users” provides the past, system-wide install capability and requires an admin. But now there is another option: “Install” allows any user, including non-admin users, to install a font for their own use.
Normally, font files come within a compressed folder. The “install” context-menu option isn’t available in File Explorer when you view the contents of a compressed folder, but you can double-click the font file within the compressed folder to open it in the font previewer, and that provides an “Install” button. In the past, the button in the font previewer had the security badge, and it would do a system-wide install, requiring an admin. Now the security badge is gone, and the “Install” button in the font previewer performs a single-user font install, which can be done by non-admins.
This is a welcome change for all those users on a shared school or work PC.

Wednesday, June 20, 2018

[Tip]: Cortana can shut down, restart or sleep your PC

Apart from various voice activated features of Cortana, you can now ask Cortana to shut down, restart or sleep your PC.
Windows 10 Fall Creators Update has added this feature.
You can shut down, restart, or sleep your PC simply by saying any of these:
  • “Hey Cortana, lock my computer.”
  • “Hey Cortana, shut down my computer.”
  • “Hey Cortana, restart my computer.”

Saturday, June 02, 2018

[Tip]: How to choose a picture for your account to show on the sign-in screen

Here’s a small tip of how to choose a photo you want to show for your account on the sign-in screen, sign-in screen.
Just goto Settings > Accounts > Your info .
Under Create your picture, select Browse for one and choose the picture you want.

Bonus tips: Here are 5 keyboard shortcuts you may not know about
  • Winkey + comma to take a quick look at the desktop
  • Winkey + L to lock your PC or switch accounts.
  • Press Alt + Tab to switch between all your open apps
  • Winkey + M to minimize all your open windows at once and
  • Winkey + Shift + M to restore all minimized windows

Sunday, May 20, 2018

Windows gets built-in Clipboard Manager

With the Preview build 17666, Windows gets completely new Clipboard experience. With the new feature, Clipboard has been taken to a new level.
To get this brand-new clipboard experience , press WinKey +V

From Settings > System > Clipboard , one can get various Clipboard options,

When you copy or cut in Windows, it’s copied to Clipboard for you to paste. Now with Clipboard history, you can now save multiple items to the clipboard to use later. One can view clipboard history by pressing Winkey+V. Clipboard History must be set to ON in settings.
When Clipboard history is On, you can also pin the items you find yourself using all the time. Thus your favorite items will be saved even when you clear your clipboard history or restart your PC.

When Sync across device is ON, one can paste text on other devices.
This history is roamed using the same technology which powers Timeline and Sets, which means you can access your clipboard across any PC with this build of Windows or higher.
NOTE: As of now, Roamed text on the clipboard is only supported for clipboard content less than 100kb. Currently, the clipboard history supports plain text, HTML and image less than 1MB.